Running TWCore on Windows
Prior warning: I must admit that the bots that come with TWCore aren't the best to be applied to any zone, most of them are quite specific for Trench Wars. However, the TWCore Core is a good basis for hosting and creating new bots on.
This guide describes and helps you to setup TWCore to run in your zone.
If you want to develop bots for TWCore, see the Programming guide.
The following steps are described:
Directory structure
The following directory structure is recommended and used throughout this guide:
C:\Subspace |
|
|---|---|
C:\Subspace\bin |
|
C:\Subspace\bin\ant |
Ant installation |
C:\Subspace\bin\svnkit |
SVNKit installation |
C:\Subspace\bin\twcore |
TWCore main directory |
C:\Subspace\bin\twcore\bin |
TWCore binary and configuration files |
C:\Subspace\bin\twcore\src |
TWCore source export from repository |
Problems while following this guide? Ask your question at the discussion forum!
Prerequisites
There are some things you need to have for running TWCore:
-
Java Development Kit (JDK)
Install to a directory of your choice. -
Ant (Download Current Release of Ant, .zip archive)
Extract to a directory of your choice. However, it's recommended to extract to a subdirectory close your twcore directory. For example,C:\subspace\bin\ant. Make sure you don't extract a new directoryapache-ant-1.7.0inside thebinantdirectory but directly into the\bin\antdirectory. -
SVNKit (Download the Latest Stable Version, Standalone Version)
Extract to a directory of your choice. However, it's recommended to extract to a subdirectory close your twcore directory. For example,C:\subspace\bin\svnkit. Make sure you don't extract a new directorysvnkit-1.1.4inside thebinsvnkitdirectory but directly into the\bin\svnkitdirectory. -
(Access to) a Subspace zone
Optional:
-
(Access to) a MySQL database
Java check
Once you have java installed, make sure you can run java from the command prompt. To test/setup, follow these steps:
- Click Start
- Click Run...
- Type 'cmd' in the text field and press Enter or click OK.
- Type 'java -version' [[ENTER]]
- If you see
'java' is not recognized as an internal or external command, operable program or batch file.then you need to set the PATH to the location of your installed Java version.- Find where you've installed Java and copy the complete path of the bin directory
- Go to your System Properties (via Control Panel)
- Go to the Advanced tab
- Click on the 'Environment Variables' button
- Find the 'Path' variable in the 'System variables' section
- Click on 'Edit'
- In the 'Variable value' text field append an ';' and paste the path of your Java\bin location. For example;
C:\Program Files\Java\jdk 1.6.0_03\bin - Click the OK button 3 times and try the above again.
- Type
ECHO %JAVA_HOME% - If you see
%JAVA_HOME%then you need to setup this variable aswell:- Find where you've installed Java and copy the complete path of the directory
- Go to your System Properties (via Control Panel)
- Go to the Advanced tab
- Click on the 'Environment Variables' button
- Click the Create button in the 'System variables' section
Name: JAVA_HOME
Value: Complete path to the Java installation directory. For example;C:\Program Files\Java\jdk1.6.0_03 - Click the OK button 3 times and try the above again.
Downloading TWCore
In this step you will export the most recent TWCore version from the repository of twcore.org .
- Download update.bat and save it in the directory
C:\subspacewith the nameupdate.bat. - Execute this batch file by double clicking it
When asked for an username/password, use the TWCore.org username and password. Note that this username and password is saved. - If all goes well you should see the following output when the execution has finished:
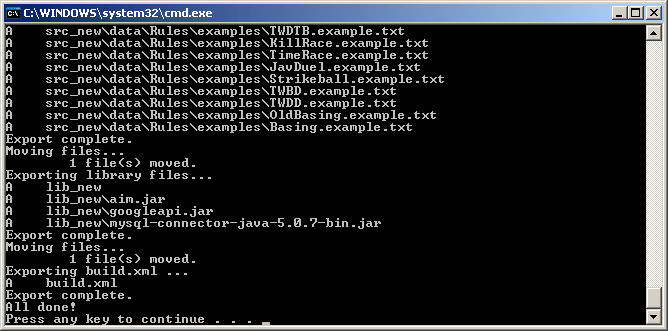
You can always update TWCore safely as it doesn't affect any running / binary files nor your configuration files.
Building TWCore
Before you can use and configure TWCore, it needs to be built.
- Download build.bat and save it in the directory
C:\subspacewith the namebuild.bat. - Execute this batch file by double clicking it
- If all goes well you should see the following output when the execution has finished:
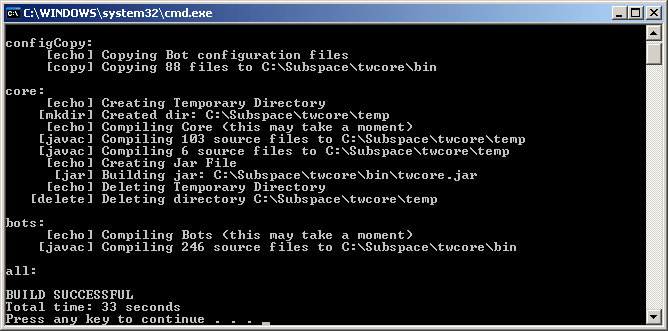
Note for building TWCore, TWCore must be turned off completely! Your configuration files will not be touched during the build process.
Configuration
Go into the C:\subspace\twcore\bin folder with explorer and configure the configuration files:
- Rename setup.example.cfg to setup.cfg
-
Open setup.cfg and fill in the settings:
[[Server]]Server
should be set to the IP of the Subspace server you are connecting toPort
should be set to the port of the Subspace server you are connecting to
[Login Information]Main Login
the name of the Continuum account for the TWCore Hubbot.Main Password
the password of the Continuum account for the TWCore Hubbot.Sysop Password
the sysop password for the zone you are connecting to.
[Chat Names]Chat Name
the default chat name of any bots that require it. Usually this is used to set to a chat used by the TWCore developers.Staff Chat
the chat name of the staff chat.Smod Chat
the chat of the smod/upper staff chat.
[[Debugging]]DebugOutput
Set DebugOutput to 0 to turn stack traces off, 1 to turn them on. Stack traces are useful for debugging bots.
[[Directories]]Core Location
Set this to the exact location where this setup.cfg is located. Do not end this with a slash. For example:C:\Subspace\TWCore(Windows) or/home/bots/twcore(Linux).
[[Logging]]Exception Log
Set the file and path of the exception log. This log will contain any exceptions the bot runs into. For example:C:\Subspace\TWCore\exception.logor/home/bots/twcore/exception.logLogPrivateMessages
Set LogPrivateMessages to 1 to have each bot record private messages in the /logs folder.
-
Rename all the files in the corecfg directory to .cfg. For example: autoload.cfg and sql.cfg. Small description of each configuration file:
- autoload.cfg
All the bots in this file will be automatically spawned when TWCore is started and connected to the Subspace server. - operators.cfg
This file provides startup permissions for specified users and defines how the bot auto-assigns privileges. - racism.cfg
This file is a list of fragments that will be flagged by racism detection. - sql.cfg
This file contains the settings for working with a database. If you do not (want to) use a database, setConnectionCountto 0. For more information, see below.
- autoload.cfg
-
[[Optional]] Configure sql.cfg:
[[General]]RetryCount
Amount of retries a connection is tried before it will be given up- ConnectionCount
Number of connections defined in this file and/or number of connections that are used.
[Connection X](Replace X for a number starting with 1, also with settings below)NameX
Name of the connection. This same name is also used by the bots. The connection names used by the bots that come with TWCore arelocal,websiteandserver.DriverX
Name of the sql driver. This is usually set tocom.mysql.jdbc.Driverwhich you don't need to change unless you want to work with a different type database then MySQL.LoginX
The username used for connecting to the database server.PasswordX
The password used for connecting to the database server.DataBaseX
The database name that should be used. Make sure this database already exist on the server.ServerX
The IP or the address of the database server. If the database is on the same machine, set it tolocalhost. If the database is not on this machine, make sure you have the database server configured that it allows external connections.PortX
The port used to communicating with the database server. If you are using a MySQL server then you can leave it set to3306.MinPoolSizeX
The minimum number of connections required to be in the pool. You can leave the default set to1.MaxPoolSizeX
The maximum number of connections of the connection pool. You can leave the default set to10.WaitIfBusyX
Wait if the connection is busy. Can be set to0or1.
You can create several connections in this file, you only need to change the X in each setting to the respective connection number.
Ready to run
If you have configured everything then you should be all set!
- Download run.bat and save it in the
C:\subspacefolder. - Double click
run.batto start TWCore - The bot with the name you configured in setup.cfg will now enter your zone. This is the HubBot, it can spawn other bots on your command.
Spawning bots
In TWCore we have two names for a specific bot; the bot type and the bot name.
The bot type is the name of the directory. The main .java and .cfg file within this directory both have the same name as the bot type. You use this bot type to specify which bot to spawn. The bot name is the name you configure inside the .cfg file.
To spawn a bot follow the following steps:
- The first time you spawn a bot you have to rename its .example.cfg file to .cfg.
For example, multibot.example.cfg to multibot.cfg. - Open the .cfg file (with notepad for example) and set the correct values. This usually consists of configuring the name, password and initial arena.
- Start up TWCore if you haven't already
- PM
!spawn <bottype>to your HubBot. - If the bot doesn't spawn into your zone, check the TWCore console for error messages.
Problems while following this guide? Ask your question at the discussion forum!